The Basics of IR microscopy
Not satisfied? Well ok then, let’s dive into details. Let’s start by terminologically dismantling the concept of FTIR microscopy. As a result we’ll end up with optical microscopy and infrared spectroscopy.
Conventional optical microscopy is by far the most widespread micro analytical technique. It is used in biology, chemistry, material science and many other disciplines across science. When it comes to industrial applications it’s used for failure and root cause analysis and to assess technical cleanliness.
Similarily, infrared spectroscopy is a classical spectroscopic method based on inducing molecular vibration in matter by infrared light. This yields an astounding amount of chemical and physical information in the form of an infrared spectrum. FTIR has been a standard technique across industry and science and is used to check the quality raw materials and products and to identify and characterize unknown compounds.

Microscopic image of a pocket watch 
Identification of Nylon with FTIR


Individually, both analytical methods are already quite powerful, but if you combine the two it gets even better. Above you can see a microscopic image of a pocket watch (left) and the identification of Nylon by a spectral reference library search.
In an infrared microscope, both form an extremely simple and comprehensive approach to microanalysis. This might be a bold (yet true) statement, however the applicational diversity of FTIR microscopy is only shadowed by FTIR spectroscopy itself. Lets take a look at some examples.
Example #1: Automotive
This car part showed clear signs of contamination after coating. On the left side you can clearly notice a smearing or other damage at the surface, while on the right the clean surface is shown.

In order to find the root cause of the product defect, it is important to establish the identity of the contaminant unambiguously. The chemical image generated with FTIR was placed on top of the visual image. As a result, the clean surface appears black and the contamination is colored according to the concentration gradient. The brighter, the more dirt.
Eventually, the contaminant was identified as black endorsing ink by a spectral reference library search, while the clean parts are covered in a clear coat finish.
Example #2: Pharmaceuticals
Although FTIR microscopy is universally applicable, there are certain industries and sciences that have made it a standard technique. This is particularly true in pharmaceutical development and quality control.
Therefore, this example shows the investigation of a foreign inclusion in a pharmaceutical tablet (Fig. 3, upper left). The tablet was investigated, and multiple measurement points set on the sample surface. The measurement spots are indicated by color; red for clean parts, blue for the contaminant.

Tablet with orange inclusion and measurement points 
FTIR spectra of Magnesiumstearate and tablet matrix

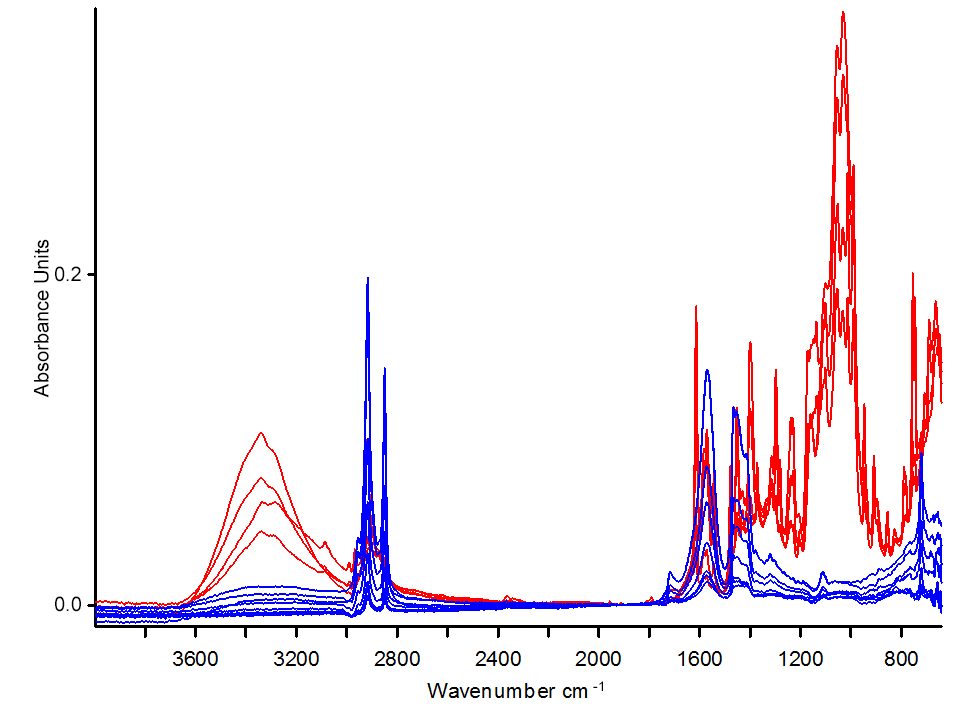
The spectra show the different chemical composition (Fig. 3, right). Identification as in the first example identifies the orange particle as magnesium stearate, which was probably introduced into the tablet during processing.
Want to know more about
FTIR microscopy?
Of course, this short article isn’t the „ultimate guide to FTIR microscopy“ but it explains the basics and how it is applied. You’ve got a question? Don’t hesitate and contact us through our website or take a look at our FTIR and Raman applications on this blog!
Bruker is the innovation leader in vibrational spectroscopy and offers infrared as well as Raman (micro) spectrometers. We love talking to our customers and always try to find the best solution to the analytical task at hand.